
Windows 11 brings an array of new features designed to improve overall system performance, but like any operating system, gaming performance can be affected by various factors. Whether you’re into fast-paced shooters, immersive role-playing games, or competitive esports, lag and low frame rates can ruin your experience. Fortunately, Windows 11 offers a variety of optimization techniques to enhance gaming performance, from system tweaks to hardware settings.
In this article, we’ll guide you through the best methods to optimize Windows 11 for gaming. Follow these tips to improve your gaming experience, reduce lag, and boost FPS (frames per second) for smoother gameplay.
1. Update Graphics Drivers
One of the most critical factors in optimizing gaming performance is ensuring your graphics drivers are up to date. Graphics card manufacturers, like NVIDIA and AMD, regularly release updates to improve performance, add support for new games, and fix bugs.
To update your graphics drivers:
- For NVIDIA users: Open the NVIDIA GeForce Experience app and check for updates.
- For AMD users: Use the AMD Radeon Software to check for updates.
- Alternatively, you can visit the official websites of your GPU manufacturer and manually download the latest driver.
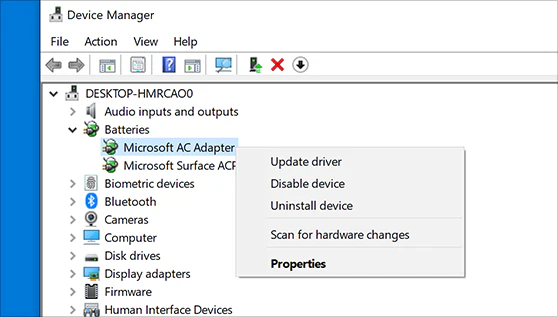
Regular driver updates ensure your system runs the latest optimizations, which can significantly impact performance in demanding games.
2. Enable Game Mode
Windows 11 comes with a built-in feature called Game Mode, which optimizes your system for gaming by prioritizing resources for the game you’re playing. It minimizes background processes, improves frame rates, and reduces latency.
To enable Game Mode:
- Open the Settings app.
- Navigate to Gaming > Game Mode.
- Toggle on the switch to enable Game Mode.
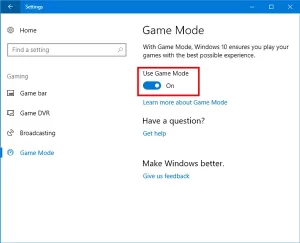
This simple setting change can offer a noticeable improvement in gaming performance, especially if you’re running resource-heavy games.
3. Adjust Power Settings for Performance
By default, Windows 11 might be set to a balanced or power-saving power plan, which limits the performance of your CPU and other hardware components. To improve gaming performance, switch to the High Performance power plan.
To adjust power settings:
- Press Win + X and select Power Options.
- Click on Additional Power Settings.
- Select the High Performance plan, or if it’s not available, choose Ultimate Performance (if your hardware supports it).
This ensures that your PC is dedicating all of its available power to running games at maximum performance.
4. Disable Background Apps and Processes
Many background applications, such as cloud storage services, update utilities, or even web browsers, consume valuable system resources while you’re gaming. These processes can lead to lag, frame drops, or stuttering in games.
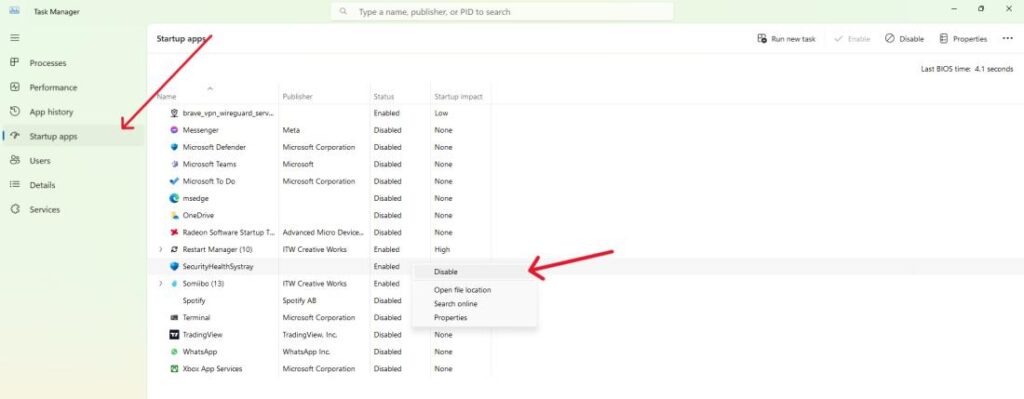
To disable unnecessary background apps:
- Open Settings and go to Privacy > Background Apps.
- Turn off apps that you don’t need running in the background.
You can also use Task Manager to close unnecessary programs:
- Press Ctrl + Shift + Esc to open Task Manager.
- Go to the Processes tab and close any unnecessary programs that are using CPU or memory resources.
5. Optimize Visual Effects
Windows 11’s default settings prioritize visual effects, which can consume system resources. By adjusting the visual effects for best performance, you can free up processing power for gaming.
To optimize visual effects:
- Right-click the Start button and select System.
- Click on Advanced system settings.
- Under Performance, click on Settings.
- Choose Adjust for best performance to disable unnecessary animations and effects.
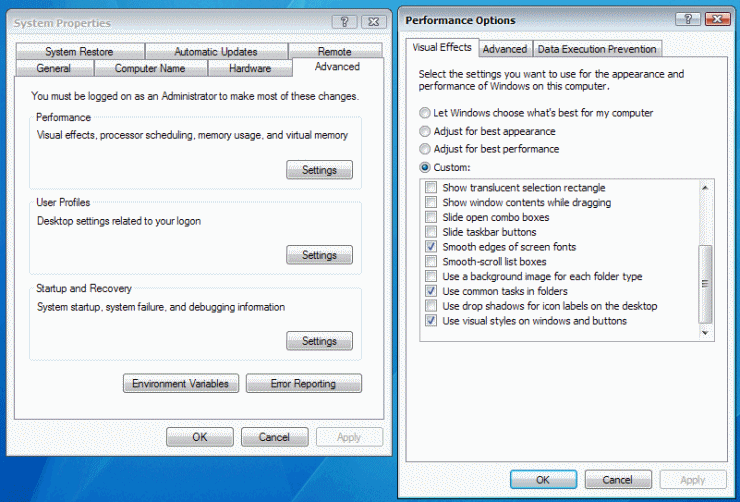
This change won’t make your PC look as visually appealing, but it will free up system resources for gaming.
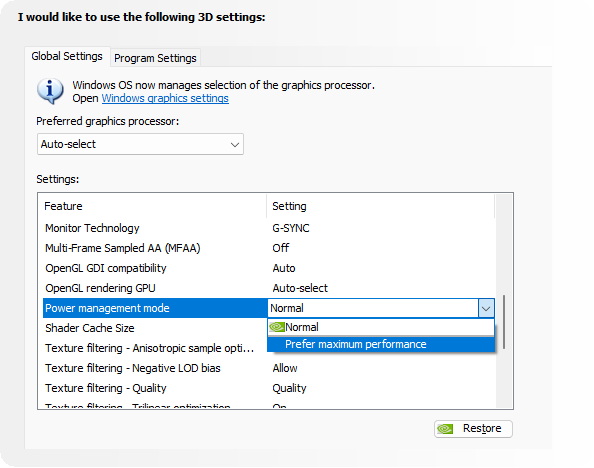
6. Enable Hardware-Accelerated GPU Scheduling
Windows 11 supports hardware-accelerated GPU scheduling, which allows your GPU to manage its own memory more efficiently, reducing CPU overhead and improving performance in games.
To enable GPU scheduling:
- Open Settings and navigate to System > Display.
- Scroll down and click Graphics.
- Toggle the switch for Hardware-accelerated GPU scheduling to On.
Enabling this feature can reduce latency and improve frame rates, especially in graphics-intensive games.
7. Install DirectStorage and Enable Auto-HDR
Windows 11 supports DirectStorage, a feature that allows games to load faster by utilizing NVMe SSDs. This feature, paired with Auto-HDR, can significantly improve load times and visual quality in supported games.
To enable DirectStorage and Auto-HDR:
- Make sure your system has a compatible NVMe SSD.
- Ensure your GPU supports DirectStorage (NVIDIA RTX 20-series or higher, AMD RX 6000-series).
- Enable Auto-HDR in Display Settings under Windows HD Color settings.
This combination of features can help reduce loading screens and improve overall gaming performance.
8. Optimize In-Game Settings
Most modern games allow you to adjust the graphics settings for a balance between visual quality and performance. If you’re experiencing lag or low frame rates, consider lowering some in-game settings to improve performance.
Here are some settings to adjust:
- Resolution: Lowering the resolution can boost performance, but it may affect visual quality.
- Texture Quality: Reducing texture quality can help if you’re running out of VRAM.
- Shadow Quality: Shadows can be taxing on your GPU, so lowering this setting can improve performance.
- Anti-Aliasing: Disabling or reducing anti-aliasing can help increase FPS.
Many games have presets such as Low, Medium, and High. You can start with Medium or Low settings and adjust them to find a good balance between performance and visual quality.
9. Upgrade Your Hardware
While software optimizations can help, sometimes the best way to improve gaming performance is by upgrading your hardware. Windows 11 is optimized for modern hardware, so if you’re using older components, upgrading could yield significant performance boosts.
Consider upgrading:
- Graphics Card (GPU): A more powerful GPU will significantly improve performance in graphically demanding games.
- Memory (RAM): Upgrading your RAM to at least 16GB can help with multitasking and performance in some games.
- Storage: Moving your games to an NVMe SSD can drastically reduce load times and improve performance.
- Processor (CPU): If you’re playing CPU-intensive games, a faster processor can provide a noticeable performance improvement.
10. Keep Windows 11 Updated
Finally, ensure that your system is up to date with the latest Windows 11 updates. Microsoft regularly releases updates that include performance improvements, bug fixes, and security patches that can enhance your gaming experience.
To check for updates:
- Open Settings.
- Navigate to Windows Update and click Check for updates.
Having the latest updates ensures that your system is running the most optimized version of Windows 11, which can improve gaming performance and overall system stability.
Conclusion
Optimizing your Windows 11 PC for gaming requires a combination of software settings and hardware improvements. By updating your drivers, enabling Game Mode, adjusting power settings, disabling background apps, and tweaking visual effects, you can significantly improve your gaming experience. Additionally, upgrading your hardware and keeping your system up to date with the latest updates can help ensure you get the best performance from your games.
Follow these optimization tips, and you’ll be on your way to enjoying a smoother, more responsive gaming experience on Windows 11.


