Product Help for Doc PLUS

Doc Plus is a user-friendly word processing application. It provides a comprehensive set of tools for creating, editing, and formatting text documents. With features like advanced formatting options, templates, mail merge, track changes, and macro support, Doc Plus is designed to enhance productivity for both novice and experienced users. Its intuitive interface and robust functionality make it an ideal choice for all your document creation needs.

1. Writing and Editing

Entering and Editing Text

  • Click in the document area to place the cursor where you want to start typing.
  • Type your text directly into the document.
  • To edit existing text, click and drag to select the text, then start typing to replace it.

Formatting Text

  • Font Style, Size, and Color:
    • Select the text you want to format.
    • Use the toolbar to choose the font style, size, and color.
  • Bold, Italics, Underline:
    • Select the text you want to modify.
    • Click the Bold, Italics, or Underline button in the toolbar to apply the formatting.

Paragraph Formatting

  • Alignment:
    • Select the paragraph you want to align.
    • Click the alignment buttons in the toolbar (Left, Center, Right, Justify) to set the alignment.
  • Indentation:
    • Select the paragraph you want to indent.
    • Use the Increase Indent and Decrease Indent buttons in the toolbar to adjust indentation.
  • Line Spacing:
    • Select the paragraph you want to format.
    • Go to “Format” > “Paragraph” > “Line Spacing” and choose the desired spacing option.

2. Page Layout

Setting Page Margins

  • Go to “Format” > “Page”.
  • Select the “Page” tab.
  • Adjust the margins (Top, Bottom, Left, Right) as needed.
  • Click “OK” to apply the changes.

Adding Headers and Footers

  • Go to “Insert” > “Header and Footer”.
  • Select “Header” or “Footer” and choose the style.
  • Click inside the header or footer area to add content.

Page Numbering

  • Click inside the header or footer where you want the page number.
  • Go to “Insert” > “Field” > “Page Number”.
  • Format the page number as needed using the toolbar options.

Creating and Managing Sections

  • Place the cursor where you want to create a new section.
  • Go to “Insert” > “Section”.
  • Name the section and set any desired options (columns, background, etc.).
  • Click “Insert” to create the section.
  • To manage sections, go to “Format” > “Sections” and adjust settings as needed.

3. Working with Styles

Applying and Modifying Styles

  • Select the text you want to apply a style to.
  • Go to the “Styles” menu in the toolbar.
  • Choose a style from the list (e.g., Heading 1, Body Text).
  • To modify a style, right-click on it in the Styles menu and select “Modify”.
  • Adjust the formatting options and click “OK” to save changes.

Creating Custom Styles

  • Go to “Styles” > “New Style from Selection”.
  • Enter a name for your custom style.
  • Click “OK” to save the new style.
  • To edit a custom style, right-click on it in the Styles menu and select “Modify”.

Using Style Inspector

  • Go to “Tools” > “Style Inspector”.
  • Select the text to see the applied styles in the Style Inspector panel.
  • Use the panel to make adjustments or to understand the hierarchy of applied styles.

4. Inserting Elements

Adding Images and Objects

  • Place the cursor where you want to insert the image or object.
  • Go to “Insert” > “Image” or “Insert” > “Object”.
  • Select the image or object from your computer and click “Open”.
  • Resize and position the image or object as needed.

Inserting Tables

  • Place the cursor where you want to insert the table.
  • Go to “Table” > “Insert Table”.
  • Specify the number of rows and columns and click “OK”.
  • Enter data into the table cells.

Using Charts and Graphs

  • Place the cursor where you want to insert the chart.
  • Go to “Insert” > “Chart”.
  • Select the chart type and input the data range.
  • Customize the chart as needed and click “Finish”.

Adding Hyperlinks and Bookmarks

  • Select the text or object you want to turn into a hyperlink or bookmark.
  • Go to “Insert” > “Hyperlink” or “Insert” > “Bookmark”.
  • Enter the URL or bookmark name and click “Apply”.

5. Advanced Features

Using Templates

  • Go to “File” > “New” > “Templates”.
  • Select a template from the list or download one from the internet.
  • Customize the template as needed.

Mail Merge

  • Go to “Tools” > “Mail Merge Wizard”.
  • Follow the wizard steps to select the document and data source.
  • Complete the merge and print or save the merged documents.

Track Changes and Comments

  • Go to “Edit” > “Track Changes” > “Record”.
  • Make your changes; they will be tracked automatically.
  • To add comments, select the text and go to “Insert” > “Comment”.

Using Macros

  • Go to “Tools” > “Macros” > “Record Macro”.
  • Perform the actions you want to record and click “Stop Recording”.
  • Save the macro with a name.
  • To run the macro, go to “Tools” > “Macros” > “Run Macro” and select the macro.

6. Printing and Exporting

Print Settings

  • Go to “File” > “Print”.
  • Adjust the print settings such as number of copies, range, and orientation.
  • Click “OK” to print the document.

Previewing and Printing Documents

  • Go to “File” > “Print Preview”.
  • Review the document layout and make any necessary adjustments.
  • Click “Print” to print the document.

Exporting to PDF and Other Formats

  • Go to “File” > “Export As” > “Export as PDF”.
  • Configure the PDF settings and click “Export”.
  • To export to other formats, select “File” > “Save As” and choose the desired format.

7. Turn on Spell Checking

Follow the following steps to turn on Spell Checking in DOC Plus.

Enable LanguageTool

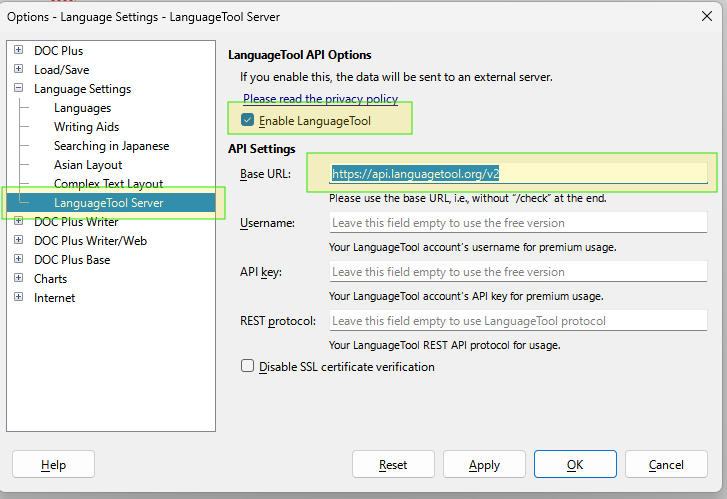
  • From the file menu, go to Tools > Options.
  • In the Options window, navigate to Language Settings > “LanguageTool Server”.
  • Check the “Enable LanguageTool” option box
  • In API Settings, make sure the Base URL: is set to use: Enter the server address: https://api.languagetool.org/v2.
  • Click “OK” or “Apply” to save the change
  • Restart the DOC Plus app

Select Language Modules

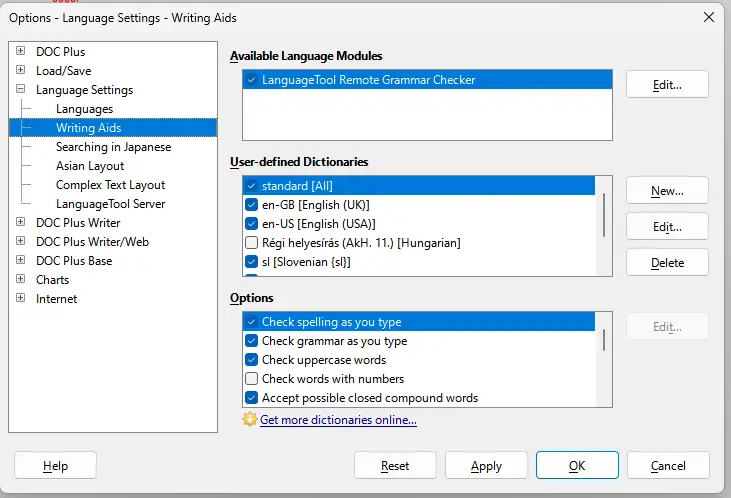
  • Open a document in DOC Plus.
  • Go to Tools > Options.
  • In the Options window, navigate to Language Settings > Writing Aids.
  • Under “Available Language Modules” section, ensure that “LanguageTool Remote Grammar Checker” is selected 

Configure Writing Aids:

  • In the Writing Aids section, ensure that Check spelling as you type and Check grammar as you type are checked.

Now, LanguageTool should be active in DOC Plus using the LanguageTool API Server, providing advanced spell checking and grammar checking capabilities. Misspelled words will be underlined in red, and grammar issues will be underlined in blue.

Troubleshooting and FAQs

Common Issues and Solutions

  • Problem: Document won’t open.
    • Solution: Ensure the file format is supported and the file is not corrupted. Try opening it with a different application to check.
  • Problem: Formatting not displaying correctly.
    • Solution: Check the document’s compatibility settings and ensure the correct template is applied.

Frequently Asked Questions

  • Q: How do I recover an unsaved document?
    • A: Check the AutoRecovery feature in “Tools” > “Options” > “Load/Save” > “General”. If enabled, check the recovery folder specified.
  • Q: How can I improve performance with large documents?
    • A: Increase memory allocation in “Tools” > “Options” > “Memory”. Also, consider breaking the document into smaller files.

Table of Contents